AI Agents in Embedded: Spec-Driven TDD
Embedded teams skipped TDD because the cost was too high. AI agents change the economics. Spec-driven testing for an IMU driver on Yocto.
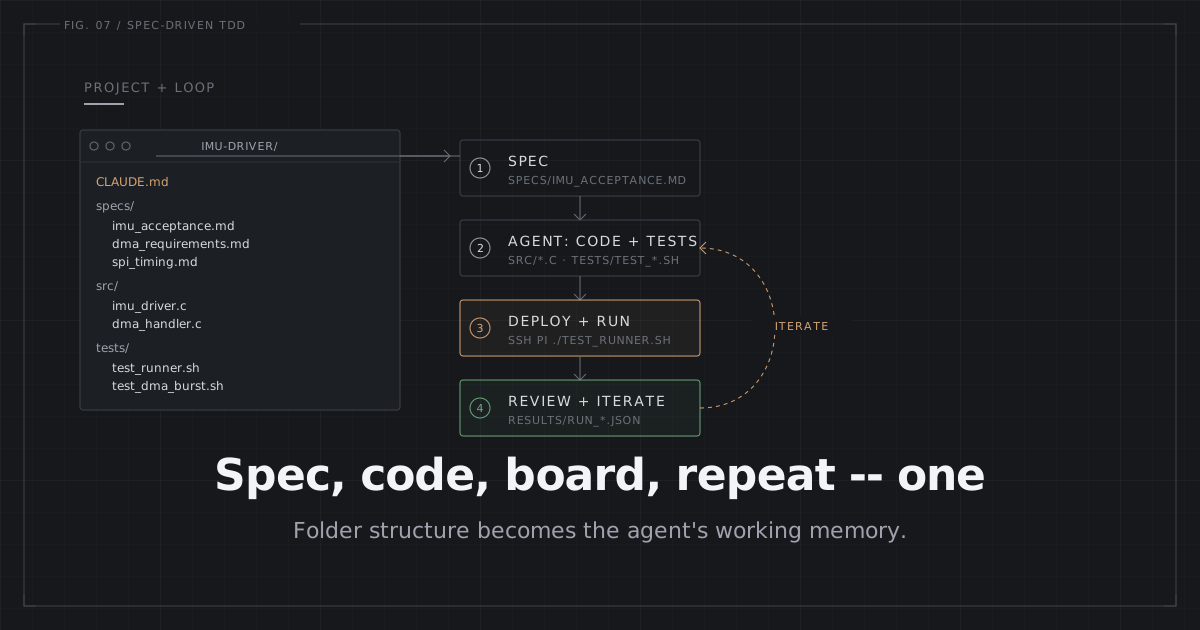
On this page
I asked Claude Code to test an IMU sensor driver on a Raspberry Pi 4 running Yocto. It ran ssh pi lsmod | grep imu, then ssh pi cat /sys/class/imu0/data, then ssh pi dmesg | tail -30. Three tool calls. Fifteen seconds of wall time. Then it declared the driver working, on the grounds that lsmod showed the module loaded and /sys/class/imu0/data returned numbers.
The numbers were garbage. A missing cache sync meant the DMA transfer was corrupting every third sample. dmesg had it all: intermittent Unhandled fault entries scattered through the normal log lines. The catch was that the agent read only the last 30 lines, and that window happened to land in a clean stretch.
This is where AI-assisted embedded Linux development sits in March 2026. The tools work. The workflow doesn’t.
The fix is TDD. Embedded teams have known that for years. They skipped it because writing and running tests against target hardware cost too much. Cross-compile, deploy, SSH in, read logs, repeat. The agent changes that equation. It generates tests from a spec, runs them through a structured wrapper, and keeps hammering at failures with no human in the loop. The practice isn’t new. What’s new is the economics.
Every example in this series runs on Claude Code, Anthropic’s agentic coding tool. The workflow principles, spec-driven testing, structured feedback, context engineering, carry over to other AI coding agents. But CLAUDE.md, subagent orchestration, and /clear are Claude Code only.
The Broken Inner Loop
A RunSafe Security survey (published January 2026, covering 2025 adoption) puts 80%+ of embedded teams on AI tools now, with 83% having shipped AI-generated code to production. Discount the exact numbers a bit; the audience skews toward early adopters. The direction is clear anyway: adoption is nearly universal. The real question is what people do with these tools.
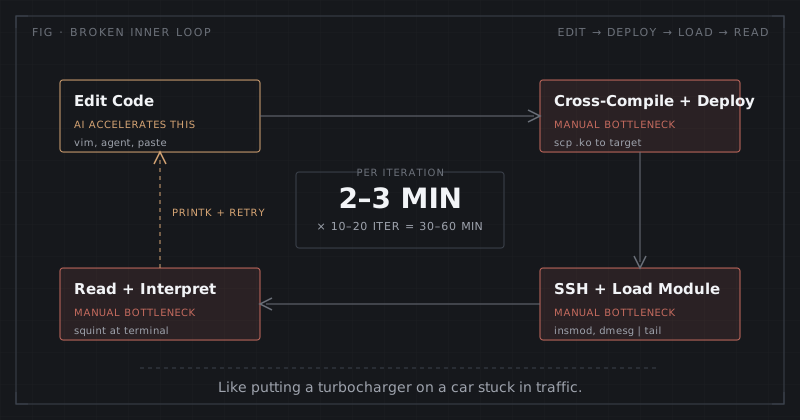
Mostly they paste AI output into the same edit-compile-scp-ssh-test cycle from 2015. The agent writes code faster, but code-generation speed was never the bottleneck. The bottleneck is the deploy-test-interpret cycle between “code written” and “code verified.” On a Raspberry Pi 4 running a Yocto scarthgap image, one lap of cross-compile plus scp, insmod, and a dmesg check takes 2-3 minutes minimum. You run that 10-20 times per driver feature. That adds up to 30-60 minutes per feature spent loading kernel modules, reading dmesg, adding printk, redeploying. Most of it is waiting and squinting at terminal output.
Fixing the Feedback Loop
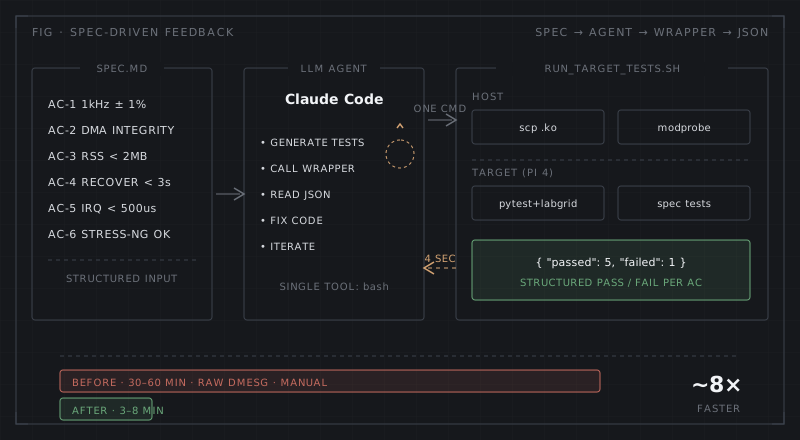
After six months of Claude Code on embedded Linux projects (Yocto BSP, kernel modules, SPI/I2C sensor drivers), two structural changes were what made the difference. It wasn’t better prompts or a smarter model. It was giving the agent a feedback channel it could actually use.
Write the Spec First
The single highest-impact change. Before the agent writes any code, make it write a spec.md with testable acceptance criteria.
Without a spec, the agent only touches the happy path. It checks “does the module load?” and “can I read from sysfs?” and calls it done. That the IMU driver has to sustain 1kHz sampling within 1% tolerance, that data must survive 10,000 consecutive DMA transfers without corruption, that RSS has to stay under 2MB after an hour of running: none of that is on its radar.
| ID | Criterion | Metric |
|---|---|---|
| AC-1 | Sampling rate 1kHz within 1% tolerance | sample count per second |
| AC-2 | Data integrity after 10K DMA transfers | CRC32 match rate |
| AC-3 | RSS memory < 2MB after 1hr soak | ps RSS measurement |
| AC-4 | Recovery within 3s after SPI bus error | fault inject + timer |
| AC-5 | IRQ-to-userspace latency < 500us | timestamp delta |
| AC-6 | No data loss under CPU stress | stress-ng + sample count |
A Chalmers/University of Gothenburg study calls a related idea “AI-Friendly Artifacts,” meaning structured documentation that AI tools can parse reliably. The spec table above didn’t come out of that work, but the intuition lines up: give the agent structured input, get structured behavior back. In practice the agent generates one test function per acceptance criterion, and the results map 1:1 to your spec. You can trace coverage. You can see the gaps.
The spec also captures hardware-specific constraints the agent can’t infer from code alone. Sampling tolerances, latency budgets, memory ceilings, fault recovery behavior. Leave those out of writing and the agent produces web-developer-grade tests: they run fine, but they’re blind to the constraints that actually matter on a target device.
Return Structured Test Results
Replace the ad-hoc SSH commands with one single-command wrapper that deploys, tests, and returns JSON in a single shot. One round-trip instead of N.
L1 (where most people are): The agent fires SSH commands one at a time. ssh target lsmod, ssh target cat /sys/class/imu0/data, ssh target dmesg | tail. 3-5 seconds per call. The agent eyeballs unstructured terminal output. That’s how I started too, and it’s exactly why the DMA corruption bug above slipped through.
L2 (an afternoon’s work if you already have pytest on the host and SSH access to the target): A wrapper script that runs scp plus insmod and pytest in one go and spits out structured JSON. The agent reads pass/fail results instead of guessing from raw logs. Standing labgrid up from scratch adds about a day for inventory.yaml, SSH key setup, and Yocto package configuration.
L3 (an investment for mature projects): A test daemon resident on the target. The agent sends a POST request and JSON comes back. Fastest of the three. The cost is maintaining target-side infrastructure.
Here’s the L2 wrapper I use for an IMU sensor driver on a Yocto-based Pi 4. labgrid (from Pengutronix) handles the target abstraction, and pytest-json-report (pip install pytest-json-report) produces machine-readable output:
#!/bin/bash
set -euo pipefail

MODULE_PATH="${1:?Usage: $0 <module-path>}"
TARGET="${TARGET_HOST:-192.168.1.100}"
TEST_DIR="$(dirname "$0")/tests"
REPORT_FILE=$(mktemp /tmp/test-report-XXXXXX.json)

# 1. Deploy module
scp -q "$MODULE_PATH" "root@${TARGET}:/lib/modules/$(ssh root@${TARGET} uname -r)/extra/"
ssh -q "root@${TARGET}" "depmod -a && modprobe -r imu_sensor 2>/dev/null; modprobe imu_sensor"

# 2. Run tests on host -- labgrid reaches the target via SSH
cd "$TEST_DIR"
pytest --lg-env ../inventory.yaml \
       --json-report --json-report-file="$REPORT_FILE" \
       -q 2>/dev/null || true

cat "$REPORT_FILE"
rm -f "$REPORT_FILE"
|| true keeps the script running after a test failure so it still writes the JSON report. Infrastructure failures (pytest crash, missing labgrid config, unreachable target) can leave an empty or malformed report. For production use, check that the report file is non-empty and capture stderr to a log.
When the agent calls ./run_target_tests.sh build/imu_sensor.ko, structured JSON comes back (trimmed here; the real pytest-json-report nests error detail inside a call stage object):
{
  "created": 1773628800,
  "duration": 4.2,
  "exitcode": 1,
  "summary": {"passed": 4, "failed": 2, "total": 6},
  "tests": [
    {"nodeid": "test_imu::test_module_loads", "outcome": "passed"},
    {"nodeid": "test_imu::test_sysfs_readable", "outcome": "passed"},
    {"nodeid": "test_imu::test_sampling_rate_1khz", "outcome": "passed"},
    {"nodeid": "test_imu::test_dma_data_integrity", "outcome": "failed",
     "longrepr": "AssertionError: CRC mismatch in 847 of 10000 transfers (91.5% pass, need 100%)"},
    {"nodeid": "test_imu::test_memory_soak", "outcome": "passed"},
    {"nodeid": "test_imu::test_irq_latency", "outcome": "failed",
     "longrepr": "AssertionError: p99 latency 1.2ms exceeds 500us limit"}
  ]
}
One round-trip. Four seconds. Structured pass/fail. The agent sees what failed and why, right away.
That DMA corruption bug from the opening? AC-2 caught it on the first run. The agent added the missing dma_sync_single_for_cpu() call and re-ran. From bug to fix was under 3 minutes. The Embedded Kit published similar Yocto test-automation infrastructure using their Pluma tool across 10 DUTs, which is evidence the pattern scales to production CI.
Beyond Example-Based Tests: Property-Based Testing
The spec-driven approach above works well for acceptance criteria you already know. But there’s one class of bug it misses: the edge cases you never thought to specify.
Example-based tests (AC-1 through AC-6) only cover the scenarios you wrote down yourself. Say your SPI frame parser has a buffer-handling bug that trips on a specific byte sequence. Unless you were clairvoyant enough to bake that exact sequence in, no acceptance criterion catches it.
Property-based testing fills that gap. Instead of writing test cases one by one, you define an invariant (“for any valid input, this property holds”) and let a generator sweep thousands of inputs on its own. When it finds a failure, it shrinks the input down to the smallest reproducing case.
For embedded C that can run on the host, the pattern goes like this. Compile the module as a shared library, load it through Python CFFI (a foreign function interface that calls C functions directly), and hammer it with Hypothesis. Install with pip install cffi hypothesis:
# tests/test_imu_properties.py
from hypothesis import given, strategies as st
import cffi

ffi = cffi.FFI()
ffi.cdef("""
    typedef struct { int16_t accel[3]; int16_t gyro[3]; uint32_t timestamp; } imu_sample_t;
    int parse_imu_frame(const uint8_t *buf, int len, imu_sample_t *out);
""")
lib = ffi.dlopen("./build/libimu_host.so")  # cc -shared -o build/libimu_host.so imu_spi.c

@given(data=st.binary(min_size=1, max_size=64))
def test_parser_never_crashes(data):
    """No input should crash the parser. It either succeeds or returns an error code."""
    buf = ffi.new("uint8_t[]", data)
    sample = ffi.new("imu_sample_t *")
    ret = lib.parse_imu_frame(buf, len(data), sample)
    assert ret in (0, -1)  # 0 = valid frame, -1 = parse error
This finishes in milliseconds on the host. No target hardware at all. Hypothesis found a bug in my frame parser within 10 seconds: a specific byte combination that looked like a valid header but carried a truncated payload, which made the parser read past the buffer. The shrunk failing case was 7 bytes. I’d never have hand-written a test aimed at that sequence.
Property-based tests cover the logic layer. Spec-driven tests cover the integration layer. Run them together and you catch bugs at both. The full pipeline post shows how these mesh with fuzzing and hardware-in-the-loop validation in a four-layer testing pyramid.
Where the Approach Breaks
The spec-driven wrapper covers roughly half of what matters on a typical embedded Linux driver. The other half looks like this.
Concurrency. Race conditions, lock contention, priority inversion. The agent can run ThreadSanitizer or Helgrind. What it can’t do is design the workload that triggers a specific race. For that you need someone who has met that class of bug before.
Hardware faults. Power loss, a stuck SPI bus, interrupt storms. The agent can write software fault injection (stress-ng, forced module unload/reload). Physical faults need physical equipment. labgrid does support power control through PDUs and USB power switches (e.g. SiS-PM), but someone still has to wire it up and define what “recovery” means.
Agent autonomy itself. Not all driver code carries the same risk. I let the agent generate test suites and Yocto recipes without much oversight. Code that touches register configuration, interrupt handlers, or DMA setup, I review line by line. Knowing where to draw that line takes the kind of experience the agent doesn’t have.
And even inside its sweet spot, it isn’t frictionless. Last week the agent wrote an AC-4 test (SPI bus error recovery) that reached for spi-fault-inject, a tool living in a newer kernel staging tree. Our Yocto image is pinned to kernel 6.1 LTS, which doesn’t ship that module. The test broke on the target with modprobe: FATAL: Module spi_fault_inject not found. The agent had no way to know until I wrote the kernel version constraint into CLAUDE.md (the project-root file the agent reads for persistent constraints). Detours like this cost 10-15 minutes just to diagnose, and they never show up in the polished workflow write-ups.
The new bottleneck is spec quality. Give it a vague spec (“driver should handle errors”) and the agent produces vague tests that pass trivially. Give it a sharp one (“recover within 3s after an SPI bus error, re-initialize the sensor, resume sampling without a data gap”) and it produces tests that actually catch bugs.
The rest needs human-designed scenarios, long-running CI, and physical test equipment. Anyone claiming automated coverage past that point is selling something.
Where to Start
Grab a driver or kernel module you’re working on. Write a spec.md with 5 acceptance criteria. Wire up the pytest plus labgrid wrapper (or even a bash script that runs a few checks and prints pass/fail). Have the agent generate tests from the spec. Run them with one command. Feel out what the structured feedback loop is like firsthand.
Got a parser or a data-processing module? Add a Hypothesis property test. Compile the C to a .so, load it with CFFI, define one invariant. Watch it surface an edge case you missed.
The moment the agent reads a JSON test failure and fixes the bug in under a minute, something clicks. Not because the agent is smart. Because the feedback loop is finally fast enough to iterate.
We always knew TDD was the right call for embedded. We just couldn’t afford it. Now we can.The next post covers why the agent still writes broken DMA handlers even with a perfect spec, and how context engineering fixes that. The final post puts the complete project anatomy in one place. For why this work lands on embedded engineers in the first place, see AI Finally Needs Hardware Engineers.

Comments
Loading comments...